Thursday is the spring equinox. At least, that's what the calendar says. But for residents of Northwest Arkansas who experienced a snow shower in May last year, the date is more of a suggestion.
It is the hope of spring that keeps the Ozarks residents trudging through the end of winter. Everyone is acutely aware of the final impending freeze that will inevitably occur sometime in April, and the off-and-on snow showers that refuse to end. All must endure the make-up classes on Saturdays and roads pocked by four months of ice and thaws.
Sitting indoors through a Northwest Arkansas "spring" can make anyone sick with cabin fever. It's time to bring a little sunshine into the home, but coming up with happy and unique crafts can be a challenge.
Luckily, there's Pinterest to the rescue.
Pinterest.com, a content sharing service, allows users to upload their own craft ideas, how-to's and photos through personal collections. These collections are in the form of pin-boards, which are organized according to themes. Members can also view other users' pins and search for projects to add to their personal collections.
Any of these do-it-yourself projects would be a wonderful to brighten up any space. All projects below were made from craft supplies purchased at a hobby store and took a total working time of less than 30 minutes each.
Bright Paper Bowl
Paper scraps or cut-outs
1/4 cup flour
1 1/4 cups water
Mod Podge gloss
Note: This took a lot longer to dry than I expected. The flour-based papier mache paste works very well, but it requires about 24 hours to fully dry. This DIY works really well with thick papers too, so the card-stock cut-outs I used really made for a sturdy and interesting bowl.
Cost: $5
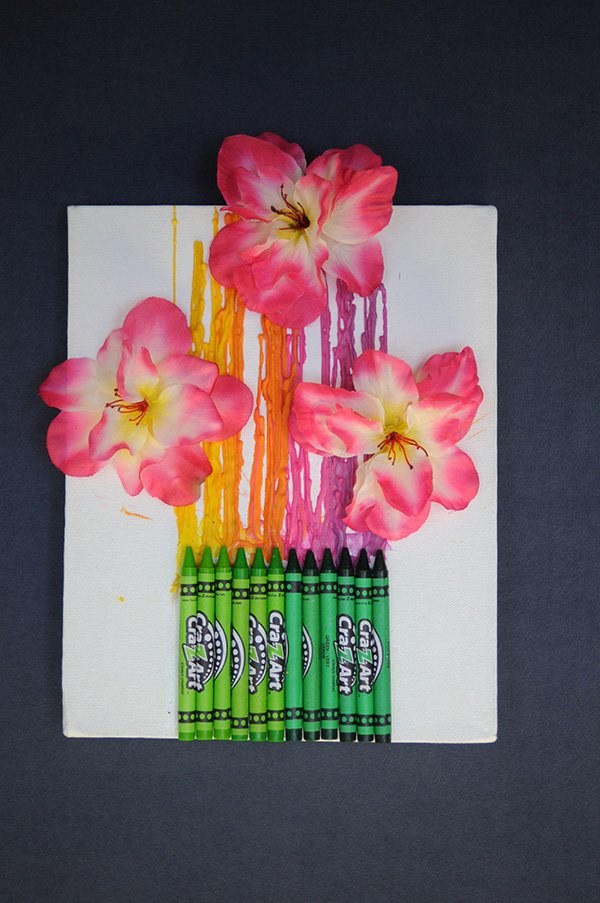
Spring Crayon Canvas
8 x 12 canvas
Crayons
3 silk flowers
Newspaper
Craft glue
Select the colors you would like to use for your project. These colors should complement the color of the flowers.
Using a hot glue gun, glue the crayons along the bottom edge of the canvas with the tips facing up.
While the canvas is flat, use a blow drier set on low to melt the tips of the crayons until the wax pools and all the colors touch.
Gently lift the bottom (crayon end) of the canvas and keep at an angle. Use the blow drier to melt more of the crayon wax and let it run the length of the canvas until you have a few "stems" for the flowers.
Lay the canvas flat on newspaper until completely dry. When dry, use the hot glue gun to glue the blossoms on the "stems" of the bouquet.
If the crayons have become misshapen from heat, gently pull them off and replace the crayons.
Note: This is messier than you might expect. I would recommend doing this project over the newspaper and keeping the blow dryer on low or else you can expect splattering melted crayons. The crayons can also be melted with a lighter, but be careful, this method will almost certainly end in setting the canvas on fire. I know this from personal experience.
Cost: $4
Paper Flower Topiary
4 inch Styrofoam ball
Scissors
Sewing pins with pearl heads
6 pieces scrapbook paper
Vase
Elmer's glue or glue gun
Begin by making the flowers. For a 4-inch ball, you will need about 35-40 flowers. Begin by cutting the scrapbook paper into 4 equal squares, then trimming these squares into a circle.
Cut the circles into a spiral, starting at the outside edge and cutting toward the center.
Roll the blossom by starting on the outside edge and coiling tightly. Continue rolling until you get to the center. You will have a tightly rolled rosette.
Release coil to loosen coil. Add a dab of glue to the center and adhere the coiled paper. Allow to dry.
Adhere flowers to the Styrofoam ball by pinning them in the middle around the ball.
To display, gently place on vase. The ball can also be used as a kissing ball by adding a ribbon to the top of the ball so it can be hung from the ceiling or door frame.
Note: Making the rolled flowers can be really tricky, but after a little practice, these flowers became my favorite to make. If you are having difficulties, check out this tutorial: www.youtube.com/watch?v=kFHun3tgZ0M
Cost: $5
Sunshine Window Cling
One toilet paper roll
Sequins and beads
Mod Podge
Contact paper
Cut toilet paper roll into 6 1/2 inch circles. Gently pinch both ends of the circles to make a crimp. The pieces of toilet paper roll should stay in the shape of a petal.
Arrange pieces on the contact paper into a flower shape. Slowly pour Mod Podge into the middle of each petal about 1/4 inch deep. Sprinkle sequins into wet Mod Podge. Allow to dry overnight.
Once dry, pour more Mod Podge into the middle of the flower, filling the shape about 1/4 inch deep. Allow to dry overnight.
Once the flower is dry, trim contact paper around outside of flower. Remove backing from sticky side of contact paper to affix to a window or other flat surface.
Note: This is very easy and a great craft project for children. It takes a few days to fully dry, but will last throughout spring and summer.
Cost: $0.50
Watermelon Welcome Mat
Circle rug
Green, white and red spray paint
Sharpie
Craft paper
Plastic sheet
Coins
Ruler
Fold your mat in half and mark it on either side with a Sharpie to reference as the mid point. Make sure your line goes with the grain of the rug. Mark with ruler and cut.
Spray paint white
Trace the outline of the rug onto the paper and cut it out. Cut two rings out along the out edge about 1 inch.
Cover the middle part of the watermelon with paper using coins to weight down the paper and spray it green.
Once dry, cover the green with 1 inch thick strip of paper, and spray red.
Allow to dry. Use sharpie to draw on 2 inch long "seeds."
Note: This required a lot of coins. I would recommend using small stones instead as you will not be able to use the coins once they are red and green. The paint stays pretty well, but I would not leave the mat outside during the rain. And since you only use one-half of the mat, you might try making another fruit with the other side.
Cost: $25
Simple Moss Topiary Tree
Preserved sheet moss
4 inch Styrofoam ball
Flower pot
Floral foam
Hot glue gun
Tree branch
Burlap ribbon
Thin the moss sheet as much as possible by removing the brown layer underneath.
Using a hot glue gun on a low temp, carefully glue the moss around the ball. Fill in any gaps with leftover moss.
Insert tree branch into Styrofoam ball.
Place a piece of floral foam inside the flower pot and push tree branch into the center. Glue around the hold to ensure it is stable and prevent the tree from leaning.
Cover the foam with leftover moss and hot glue in place.
Finish off by tying burlap ribbon around the middle of the flower pot.
Note: Preserved moss is very difficult to work with. I ended up using very small pieces to cover the ball, leaving a small empty space so I could easily insert the tree branch. This topiary tree can be dressed up with different ribbons for a year-round festive decoration.
Cost: $7
-- For more springtime craft ideas, follow Allison Carter on Pinterest.com/scatteredplans.
NAN Life on 03/19/2014