I have vivid memories of going with my mom to the AAA office to pick up our summer Triptik. The drive in our yellow Datsun from our house in North Little Rock to Rodney Parham Road was always filled with anticipation. I didn't care much for the AAA office -- it was loud with ringing phones and ladies talking, and it offered little entertainment for a prepubescent girl. But the spiral-bound Triptik of maps with our route highlighted in green was worth it.
I studied the maps for nearby attractions, planning where I wanted to stop (or hoped Mom would not insist on stopping) along the way and making mental notes of the gas pump and bed icons. Once we were on the open road, I loved following our route in the Triptik as we traveled, flipping the page every few miles.
Today's families likely have a different ritual. One that involves typing destinations into a GPS. Although I hear AAA still offers hard-copy Triptiks to its members as a "backup" for GPS.
One thing that has not changed with technology is the need for tasty meals and snacks on the road. Some road trip foods are classics -- a bottle of Coke and a handful of peanuts or stick of chewy jerky -- and are best bought at filling stations along the way. And no cross-country road trip would be complete without at least one meal at a greasy truck stop or diner. And I'm always up for whatever the locals are having, but there's only so much restaurant and drive-through fast food my stomach and wallet can afford.
That's where these travel friendly recipes come in. Whether you're planning a picnic at the lake or a two-day drive across the Great Plains, having a cooler (or two) filled with homemade food ensures there will always be something good to eat.
COOLER PACKING TIPS
• Chill the cooler before packing it with food by filling it with ice for 30 minutes.
• To make the most of the space available in the cooler use frozen food (such as bags of frozen corn or grapes) and frozen water bottles in place of gel packs or ice packs. These items will help keep the ice chest cool without taking up extra space.
• Pack the food that will be eaten first near the top of the cooler. Place the foods that need to be kept coolest in the bottom of the cooler, and fragile foods or those that can withstand warmer conditions at the top. For example, pack meat on the bottom and cheese, fresh fruits and lettuce on the top.
• Pack separate coolers for raw meats and fresh fruits and vegetables to avoid cross-contamination. Double-bag meats and fish to prevent leaks.
• Keeping the cooler inside an air-conditioned vehicle (not the trunk) will help keep it cool.
• Repeated opening of a cooler will warm its contents faster. Consider packing a separate cooler for drinks and snacks.
Sources: Campfire Cuisine: Gourmet Recipes for the Great Outdoors by Robin Donovan, myrecipes.com and personal experience.
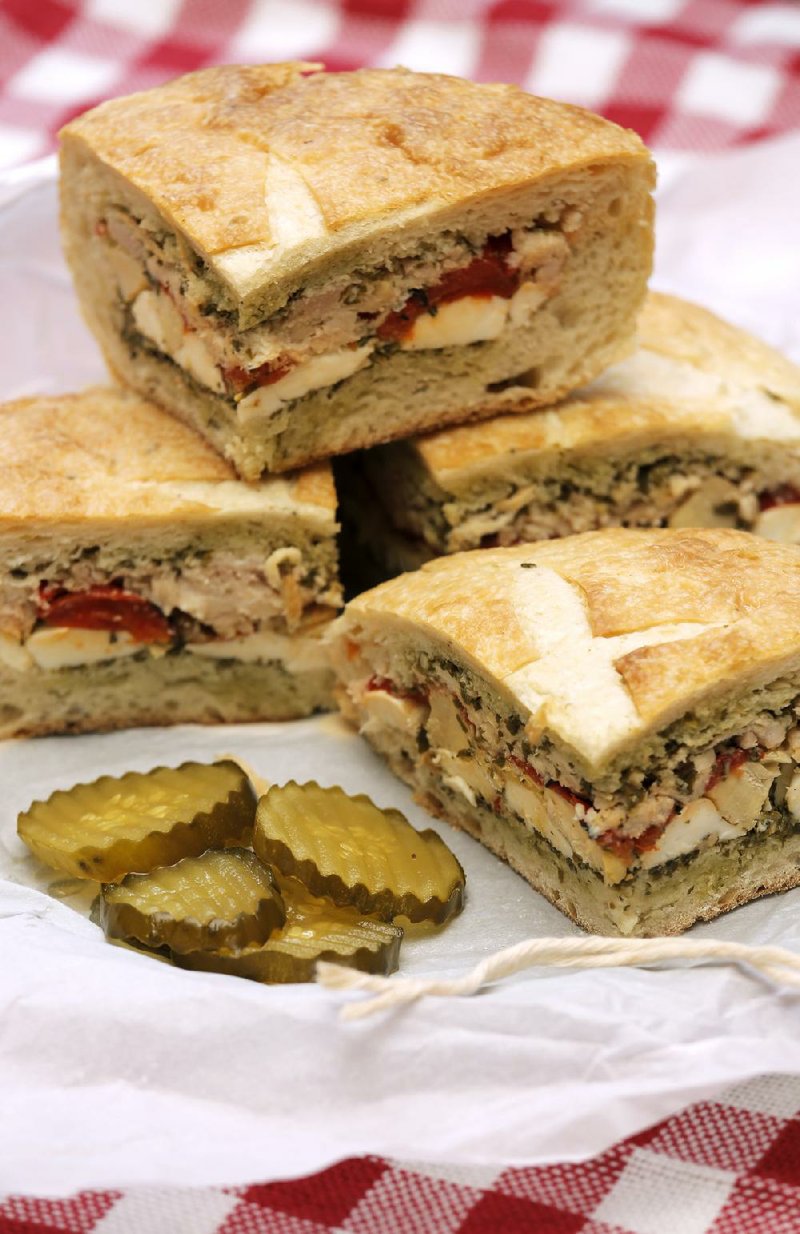
Pressed Sandwich
1 large round loaf sturdy bread
Prepared pesto
4 ounces fresh mozzarella cheese, sliced or cut into small pieces
1 (6-ounce) jar marinated artichoke hearts, drained and chopped
1 (7-ounce) jar roasted red bell peppers, drained and sliced
4 ounces thinly sliced desired deli meat OR 1 (5- or 6-ounce) can or pouch tuna, drained
Cut a large circle out of the top of the loaf of bread; set circle aside to be used as the lid. Carefully scoop out most of the inside of the bread, leaving the crusty shell.
Spread cut surfaces of the bread with pesto.
Layer cheese, artichokes, peppers and meat/tuna in the bread bowl. Top with bread lid.
Wrap entire loaf in plastic wrap and again in foil or parchment paper and weigh down loaf with a brick or other heavy object and refrigerate overnight. Or place the wrapped sandwich in the bottom of a cooler and pack the other cooler contents on top.
When ready to serve, unwrap and cut into wedges.
Makes 4 to 6 servings.
Taco Salad in a Bag
3/4 pound ground beef, turkey or chicken
1/2 onion, diced
1/2 red or yellow bell pepper, diced
1 hot chile pepper, minced, optional
1 cup canned black or pinto beans, rinsed and well drained
2 tablespoons Homemade Taco Seasoning (recipe follows) OR 1 envelope taco seasoning mix
4 (2.5-ounce) packages corn chips such as Fritos OR 1 (11-ounce) large bag corn or tortilla chips
Desired toppings such as shredded lettuce, cherry or grape tomatoes (halved or quartered), shredded cheddar cheese and/or fresh cilantro leaves
Salsa, optional
Sour cream, optional
Cook the beef, turkey or chicken along with the onion, bell pepper and chile pepper in a large skillet, breaking the meat into crumbles. Drain. Return meat to skillet and stir in beans and taco seasoning. Add 2 tablespoons of water (or the amount listed on the seasoning package) and simmer 5 minutes. To serve hot, transfer meat to a Thermos or insulated container for hot food. To serve chilled, refrigerate until cold then transfer to an insulated container for cold food.
Pack the remaining ingredients in small bags or individual containers.
When ready to eat,open bags at top and slit open the bags along the side edge. Divide meat mixture, lettuce, tomatoes, cheese and cilantro among the bags of chips. Top with salsa and/or sour cream. Serve in the bag and eat using a fork.
Or divide chips among individual bowls and top with meat, lettuce, tomatoes, cheese, cilantro. Garnish with salsa and sour cream, if desired.
Makes about 4 servings.
Homemade Taco Seasoning
1 tablespoon PLUS 1 teaspoon onion powder
1/4 cup ground ancho chile pepper or other pure chile powder
1 heaping teaspoon garlic powder
1 tablespoon ground cumin
2 teaspoons beef bouillon granules, optional
1 1/2 teaspoons dried oregano
1 1/2 teaspoons coarse salt
Crushed red pepper flakes to taste (see note)
In an airtight container combine all ingredients and mix well. Use 2 tablespoons seasoning per pound of ground beef or chicken.
Makes about 3/4 cup.
Note: Use 1 tablespoon for a medium-hot seasoning.
This spread combines all of the flavors of a BLT. It is delicious spread on a bagel or as a dip for celery and carrots.
BLT Cream Cheese
1/4 cup regular or sun-dried tomato paste
1/4 cup real bacon pieces, such as Hormel brand
1 ounce kale chips, crushed to small pieces (about 6 tablespoons)
1/4 teaspoon ground black pepper
8 ounces regular cream cheese or Neufchatel cheese, at room temperature
Bagels, carrots and/or celery sticks, optional, for serving
Combine the tomato paste, bacon bits, kale chips, pepper and cream cheese in a mixing bowl. Use a flexible spatula to blend until well incorporated. Serve right away, or cover and refrigerate for up to 3 days.
Recipe adapted from David Hagedorn
This hearty vegetarian salad can be prepared up to two days in advance.
White Bean, Zucchini and Roasted Garlic Salad
4 medium zucchini
Olive oil
Salt and ground black pepper
2 (15-ounce) cans white beans, rinsed
1 small red onion, chopped (see notes)
Peeled or squeezed cloves from 1 bulb roasted garlic, (see notes)
3/4 cup prepared balsamic vinaigrette
4 ounces feta or goat cheese, crumbled, optional
1 tablespoon chopped flat-leaf parsley
Heat oven to 425 degrees.
Slice the zucchini in half lengthwise. Coat with olive oil and season with salt and pepper. Arrange zucchini in a single layer on a baking sheet and roast, until just tender, turning once, about 15 minutes. Cool and cut into 1/2-inch slices.
Place the beans in a large bowl. Add the zucchini, red onion and garlic. Stir to combine. Drizzle with dressing and toss to combine. Cover and chill until ready to serve, up to 2 days. Sprinkle with cheese and parsley just before serving.
Makes 4 servings.
Notes: To take the "bite" out of the onion, soak the chopped onion in cold water for 5 minutes, then drain well.
To roast garlic, cut the top third off the pointed end of a bulb of garlic. Drizzle with olive oil and wrap in foil. Bake at 450 degrees until cloves are tender, 30 to 45 minutes.
Recipe adapted from Campfire Cuisine Gourmet Recipes for the Great Outdoors by Robin Donovan
Frozen Fruit Salad
1 (20-ounce) can pineapple chunks in juice
3 (6-ounce) cans frozen orange juice concentrate, thawed
1 1/2 cups seedless red and green grapes, cut in half
1 1/2 cups sliced banana
1 1/2 cups grapefruit OR tangerine segments
Drain pineapple, reserving juice in a 2-cup measure; add water to make 11/2 cups liquid.
Combine the pineapple, pineapple liquid, orange juice concentrate, grapes, banana and grapefruit segments in a large bowl and mix well. Transfer to a 9-by-13-inch baking dish.
Cover with plastic wrap and freeze 8 hours or until firm.
When ready to serve, let stand at room temperature (this may not be necessary if the salad has been stored in a cooler) for 20 minutes to soften slightly. Cut into squares.
Makes 8 servings.
Recipe adapted from Southern Living Fix It, Freeze It, Heat It, Eat It
Food on 06/18/2014