Selecting lunch gear used to be simple. Stuff the lunch into a paper bag or pick the box decorated with whichever cartoon, movie, TV or toy character enraptured your kid. Done.
Things are a bit more complicated today. Lunch box styles vary from soft-sided cooler bags to Japanese-inspired bento boxes, even Indian tiffin canisters. They can have built-in ice packs. They can be microwaved. They can be made from recycled bisphenol-A-free, lead-free, phthalate-free, PVC-free plastic. They can be forged from 18-gauge stainless steel. Some adult versions even come with their own cheese boards and wine glasses.
So how do you choose? Much depends on the types of foods you pack and how you pack them, as well as when and where you eat them. But there are some general tips that can help you sort it all out.
THE GEAR
Dishwashers rule - If it isn’t dishwasher safe, don’t buy it. Even if you don’t use the dishwasher, this tells you something about the quality and durability of a lunch box item.
Multiples matter - Get more than one of everything. This makes life much easier on those days when you forget or just don’t have time to wash the gear used the day before.
It’s in the bag - Soft-sided insulated cooler bags are the way to go. They are inexpensive and come in all shapes and sizes. They also are durable and easy to clean. Look for one with two compartments. This makes it easier to segregate items, such as easily bruised fruit, or a thermos of warm soup and a cold yogurt cup.
Food containers - These are the jars, boxes and other containers the food goes in. Be sure to get a variety of shapes and sizes to accommodate different foods. And at least some should be watertight for packing sauces, dips, puddings and other liquids. Plenty of companies also sell lunch “systems,” or sets of small containers that fit together and pack easily in an insulated bag.
These sets offer less versatility than when you assemble your own collection of containers, but they work great.
Bottle it - Even if all you ever pack is water, an insulated drink bottle is a good idea. Insulated bottles don’t sweat.
They also give you the flexibility to pack warm or cold drinks, such as hot cocoa or smoothies.
Thermoses - It’s best to have two: a conventional narrow thermos for soups and other easily spilled items, and a wide-mouthed jar for larger foods, such as warm sandwich fillings or meatballs. When selecting a thermos, be sure to check how long it will keep items hot or cold. This is important information you’ll need to keep the food you pack safe to eat. Perishable cold foods must be kept below 40 degrees. Hot foods should be held above 140 degrees. Once the temperatures go outside these ranges, the food is safe for another two hours. To keep lunches safe, figure out what time of day the lunches you pack will be eaten. Count back to the time of day the lunches are packed. This is how long you need to keep the food hot or cold.
One final tip about thermoses. They hold their temperatures best if you prime them before adding food. Packing soup or another hot item? Fill the thermos with boiling water and let it stand for a few minutes to heat it up, then dump out the water and add the food. Filling it with yogurt or something that needs to stay cold? Place the empty thermos in the freezer for a few minutes first.
Utensils - This is not the time to break out the good silverware. But I’m also not a fan of disposable plastic, which breaks easily and has a lousy environmental footprint. Instead, grab some inexpensive stainless-steel or aluminum utensils at the bargain or secondhand shop.
Ice packs - Even if you’re using an insulated lunch bag, an ice pack is a good idea, especially when packing lunches when it’s hot. As with everything else, get several so you always have one ready to go. I prefer rigid packs, rather than soft. The soft ones puncture more easily and can freeze in odd, hard-to-pack shapes.
THE FOOD
Easy, delicious lunch packing relies on leftovers. This is why there are certain dinner foods I always make sure to cook too much of: chicken, steak, pasta, rice, and grilled or roasted vegetables. They’re all easily transformed into something fresh. That’s why dinner is the best time to start thinking about the next day’s lunch. If supper leftovers could be easily repurposed, you might as well make a little extra.
So the following dinner recipes for American chop suey and bacon-cauliflower mac and cheese are intended to make too much. I designed them to leave you with ample leftovers to use for lunches.
All the built-in vegetables help make this dinner staple a true one-dish meal.
American Chop Suey
1 large yellow onion, chopped
3 red bell peppers, cored and diced, divided use
1 (15-ounce) can tomato sauce
1 tablespoon soy sauce
2 teaspoons Italian seasoning
3 ounces diced pancetta or bacon
3 cloves garlic, minced
2 pounds ground bison OR ground turkey
1 (14 ½ -ounce) can diced tomatoes
2 cups beef broth
12 ounces whole-wheat elbow macaroni
Salt and ground black pepper
In a blender, combine the onion, 2 cups of the diced bell peppers, the tomato sauce, soy sauce and Italian seasoning. Puree until smooth. Set aside.
In a large saucepan over medium-high heat, brown the pancetta or bacon for 3 minutes or until fat is rendered. Add the garlic and remaining bell pepper and saute for 3 minutes. Add the ground meat and brown, breaking up any large clumps. Add the onion-bell pepper mixture from the blender, the diced tomatoes, broth and pasta.
Bring to a simmer, then cover and cook, stirring occasionally, until the pasta is tender, 15 to 20 minutes. Season with salt and pepper.
Leftover Lunch Ideas:
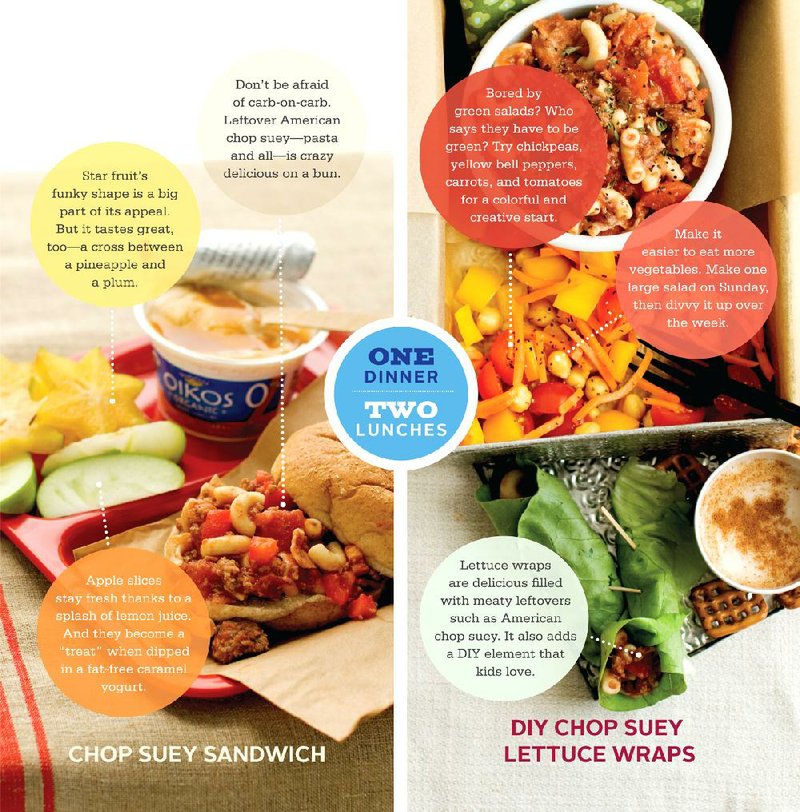
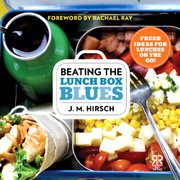
Leftover American Chop Suey is delicious warm or cold on a bun (think sloppy Joes). If you want it warm, heat the chop suey and pack it in a thermos (with the bun packed separately). At lunch, just spoon the chop suey onto the bun and enjoy. Rather not fill up on bread? Pack a thermos of warm chop suey with some large Boston lettuce leaves on the side for do-it yourself lettuce wraps!
The bacon and four cheeses make this macaroni and cheese seriously indulgent.
But the cauliflower and wholewheat pasta make it virtuous.
For speed, you can skip the breadcrumb and broiling step, making this an easy stove top meal. I’m a big believer in have it your way. I like elbow pasta for macaroni and cheese, but substitute whatever you have.
Ditto for the cheeses.
Bacon-Cauliflower Mac and Cheese
Salt
1 pound whole-wheat elbow pasta
10 strips bacon, chopped
½ medium head cauliflower, cored and cut into small florets
2 cups milk
1 tablespoon garlic powder
½ tablespoon onion powder
½ tablespoon mustard powder
½ teaspoon ground black pepper
¼ teaspoon ground red pepper (cayenne)
4 ounces cream cheese, cut into chunks
1 ½ cups grated cheddar cheese
1 ½ cups grated gruyere cheese
1 cup grated parmesan cheese
¾ cup panko breadcrumbs
¼ cup butter, melted
Heat broiler.
Bring a large pot of salted water to a boil. Add the pasta and cook al dente, about 8 minutes. Drain and set aside.
Meanwhile, in a large, deep oven-safe saute pan over medium heat, cook the bacon for 2 minutes. Add the cauliflower and saute until lightly browned, about 12 minutes. Add the drained pasta to the pan and mix well. Add the milk, garlic powder, onion powder, mustard powder, black pepper and cayenne. Mix well and heat until the milk is hot.
Add the cream cheese, stirring until melted. Sprinkle in the cheddar, gruyere and parmesan, stirring until melted.
Season with salt; set aside.
In a small bowl, toss the breadcrumbs with the melted butter, then scatter evenly over the pasta. Broil for 2 minutes, or until lightly browned.
Makes 4 servings, plus leftovers.
Leftover Lunch Ideas: Use leftover macaroni and cheese as the filling for a grilled-cheese sandwich. It was my son’s idea.
It’s a little crazy, but it’s a lot delicious. Or pack it warm in a thermos and use it as a topping for do-it-yourself nachos. Just accompany with tortilla chips and other toppings, such as bacon or sausage chunks, salsa and a package of guacamole. At lunch, spoon the warm mac and cheese onto the chips and top as desired.
Recipes from Beating the Lunch Box Blues by J.M. Hirsch (Rachael Ray Books, 2013)
Food, Pages 29 on 08/21/2013